Tạo trang download chuyển hướng cho blogspot
Bài viết này mình Hướng dẫn tạo trang download cho
blogspot đếm ngược theo thời gian cài sẵn, phù hợp với các blog chia sẻ
các link tải.
Cách tạo trang download cho blogspot đếm theo thời gian
đơn giản, đẹp mắt. Hướng dẫn tạo trang download cho blogspot.
Bước 1: Bật liên kết đính kèm trong phần cài đặt của blog
Bước 2: Tạo một trang tên là Download và qua chế độ soạn
HTML dán code dưới vào và lưu lại
(Bên Menu trái chọn Trang, sau đó thêm trang mới đặt tên là Download)
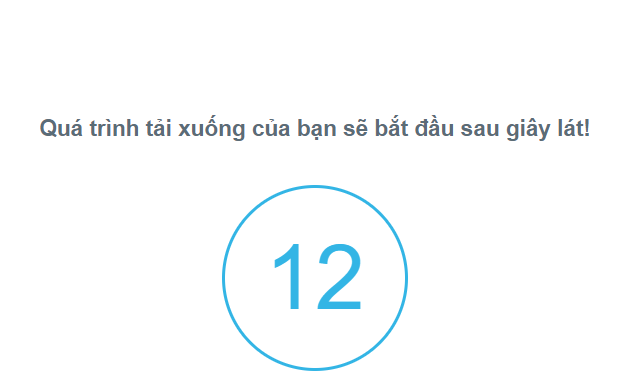
<style>
.hidden{display:none!important}.getlink-button,.time-wrapper{text-align:center}.getlink-button a{background:#6dab3c;border:1px solid #6dab3c;position:relative;color:#ffffff;font-size:14px;display:inline-block;padding:7px 20px;min-width:70px;border-radius:3px}#timer-countdown{margin:25px 0 30px 0;display:inline-block;border-radius:100%;width:120px;height:120px;line-height:120px;color:#33b5e5;border-radius:50%;border:2px solid #33b5e5;font-size:60px;font-weight:100}
</style>
<div class='time-wrapper hidden'>
  <p><b>Quá trình tải xuống của bạn sẽ bắt đầu sau giây lát!</b></p>
  <p><span id="timer-countdown">0</span></p>
  <div class="getlink-button"></div>
</div>
<script>
  var id = localStorage.getItem("luu_id"),
    get_link = localStorage.getItem("luu_get_link"),
    timer = 15;
  if (id) {
    document.querySelector(".time-wrapper").classList.remove("hidden");
    var e = setInterval(function() {
      document.getElementById("timer-countdown").innerHTML = timer, (timer -= 1) <= 0 && (clearInterval(e), document.getElementById("timer-countdown").innerHTML = "0", document.querySelector(".getlink-button").innerHTML = "<a href=" + get_link + ' target="_blank" rel="noopener nofollow" title="Get link">Get link</a>')
    }, 1e3)}
</script>
sau khi hoàn thành ta được Link: https://kienthucthuongngayedu.blogspot/p/download.html
Bước 3: Copy toàn bộ code bên dưới dán trước thẻ đóng
</body> và lưu lại
<b:if cond='data:view.isSingleItem'>
  <script>
    //<![CDATA[
    $(".post-download").click(function() {
      var e = $(this).attr("name");
      localStorage.setItem("luu_id", e), $.ajax({
        type: "GET",
        url: "/feeds/posts/summary/" + e,
        data: {
          alt: "json"
        },
        dataType: "jsonp",
        success: function(e) {
          if (e.entry) {
            for (var t = 0; t < e.entry.link.length; t++)
              if ("enclosure" == e.entry.link[t].rel && "download" == e.entry.link[t].type) {
                var n = e.entry.link[t].href;
                localStorage.setItem("luu_get_link", n)
              }
          }
        }
      }), setTimeout(function() {
        location.href = "/p/download.html"
      }, 1e3)
    });
    //]]>
  </script>
</b:if>
Bước 4: Vào chủ đề - HTML tìm thẻ <data:post.body/> dán code bên dưới trên hoặc dưới thẻ vừa tìm được. Lưu ý có thể sẽ có nhiều vị trí, các bạn tìm và test cho đúng vị trí của nó.
<style>.down-enclosure{text-align: center;}.post-download{background-color: #D26E4B; color: #fff;}</style>
<b:loop index='i' values='data:post.enclosures' var='enclosure'>
<b:if cond='data:enclosure.mimeType == "download"'>
<div class='down-enclosure'><button aria-label='Tải về' class='post-download' expr:name='data:post.id' type='button'>Tải về</button></div>
</b:if>
</b:loop>Lưu ý: Nếu blog chưa có thư viện jQuery thì thêm code dưới trước thẻ </head>
<script src="https://ajax.googleapis.com/ajax/libs/jquery/3.2.1/jquery.min.js"></script>
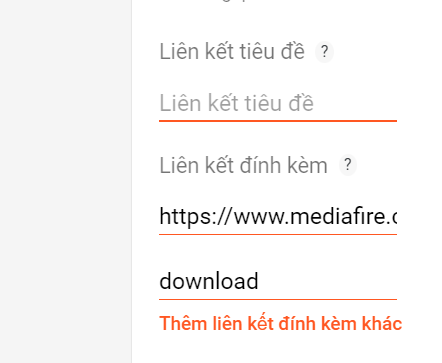
Cuối cùng là bước chèn link download như hình bên, mở mục lên kết ở phần bên phải khi đăng bài. Bên trên chúng ta chèn link, bên dưới nhập chữ download
Chúng ta phải vào phần cài đặt của blogspot bật ĐƯỜNG LIÊN KẾT TIÊU ĐỀ VÀ ĐÍNH KÈM
Chúc các bạn thành công!


